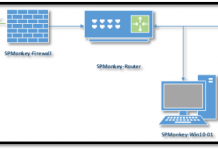
In this scenario, I will use 4 servers installed in Windows Server 2019 that are represented in the following diagram to deploy a single-server Workflow farm for SharePoint 2019.

Prepare Workflow service accounts and groups
The following accounts are created and used in this deployment.
| Account/Group | Description | Permissions |
| wfAdmin | Workflow install account |
|
| wfSvc | Workflow service account |
|
| wfAdmins | Workflow admins group. |
|
To add the wfAdmin account into the SQL server with the ‘Sysadmin’ role, logging on the SQL server and connect SQL instance. Expand the Security node then right-click on the Logins node and select “New Login…”

On the Login dialog box, enter the wfAdmin account:

Select the Server Roles then select the sysadmin role checkbox. Click OK to complete.

Install and Configure Workflow Manager
Install Workflow Manager and its components.
- Log onto the WF server with wfAdmin account. Note: Assume you already added wfAdmin into this server as a local administrator
- Download and install Web Platform Installer at https://www.iis.net/downloads/microsoft/web-platform-installer
-
Open Web PI, search for Workflow Manager and install Workflow Manager 1.0 Refresh (CU2). It will install the other following components automatically:
- Workflow Manager 1.0 for existing installs only – Use Workflow Manager 1.0 Refresh (CU2) for new installs.
- Windows Azure Pack: Service Bus 1.1.
- Workflow Manager Client 1.0 Cumulative Update 4.
- After the installation of Workflow Manager 1.0 Refresh (CU2), restart Web PI and search for Workflow Manager again. This time we will install the latest update of Workflow Manager, Workflow Manager 1.0 Cumulative Update 5.


Configure SSL.
Now we will setup SSL to encrypt communication between the Workflow server and the SQL server.
From the Workflow server:
- Click on the Start menu and search for “cert”1. Select “Manage Computer Certificates“
- Expand Personal node then right-click on Certificates. Select All Tasks
è
Request New Certificate…
- Click Next twice then select Computer checkbox under “Active Directory Enrolment Policy”
- Click the “Enroll” button.

- Check and make sure you see the new Workflow certificate added.

Configure Workflow Manager
After completing the SSL enrollment for the Workflow server, open the Workflow Manager Configuration from the Start menu. Select “Configure Workflow Manager with Custom Settings”

Enter the SQL Server instance name, select SSL checkbox to enable SSL communication, and other information on the Workflow Manager Configuration screen.
Select and Enter information for Service Bus Configuration
Install and Configure Workflow Manager Client
Before you can run the workflow pairing cmdlet, you must install the Workflow Manager Client on each of the servers in the SharePoint farm. This section provides a walkthrough of the installation of the Workflow Manager Client in the SharePoint 2019 farm environment. In this scenario, we have one server.
- Download and install the Workflow Manager Client here: https://go.microsoft.com/fwlink/p/?LinkID=268376
Once the installation has completed, open the SharePoint Management Shell as an administrator. This is accomplished by right-clicking the SharePoint Management Shell command and choosing Run as administrator.
Run the Register-SPWorkflowService cmdlet shown below.
Register-SPWorkflowService
-SPSite
“http://sp2019-sp/sites/dev”
-WorkflowHostUri “http://wf.spmonkey.local:12290”
Test workflow
Open a SharePoint site, in this case, it is http://sp2019-sp/sites/dev in SharePoint Designer.
Select the Workflows link on the navigation then click on Site Workflows, you should see the SharePoint 2013 Workflow displays as shown in the following screenshot.


